FortiGate firewall ssl installation step


Step 1: Downloading your SSL Certificate & its Intermediate CA  Certificate:
  1. If you had the option of server type during enrollment and selected Other you will receive a x509/.cer/.crt/.pem version of your certificate within the email. Alternately you can access your Certificate User Portal by the supplied link in the email to pick up the x509 version of your certificate.
  2. Copy the SSL certificate and make sure to copy the —–BEGIN CERTIFICATE—– and —–END CERTIFICATE—– header and footer Ensure there are no white spaces, extra line breaks or additional characters.
  3. Use a plain text editor such as Notepad, paste the content of the certificate and save it with extension .crt
  4. If your intermediate CA certificate for your product is not in the body of the email you can access your Intermediate CA also in a link within that email. Copy and paste the contents of your Intermediate CA into its own Notepad file and save it with a .crt extension also.
    Note: Some CAs may require two intermediates for best compatibility. These two are to be copied within their own corresponding .crt files and installed one at a time in a repeated process for intermediate installation.
Step 2: Importing your SSL Certificate:
  1. Log into your FortiGate System.
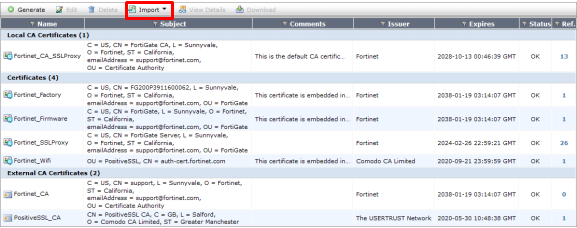
  2. Browse to System > Certificates.
  3. Select Import > Local Certificate.
  4. Browse to the location and path of your SSL certificate.
  5. Click OK.
The status of the certificate should change from PENDING to OK
Step 3: Importing your Intermediate CA:
  1. Browse to System > Certificates.
  2. Select Import > CA Certificate.
  3. Browse to the location and path of your Intermediate CA certificate.
  4. Click OK.
    Your Intermediate CA should be under the CA Certificate section of the certificates list.
Step 4: Configuring your FortiGate VPN to use the new SSL certificate:
  1. Browse to VPN > SSL > Settings.
  2. In the Connection Settings section under the Server Certificate drop down select your new SSL certificate.
  3. Click ApplyYou have configured the Foritgate VPN to use the new SSL certificate.


Tomcat Server SSL Installation


  1. Download your certificate files from your certificate authority and save them to the same directory as the keystore that you created during the CSR creation process. The certificate will only work with the same keystore that you initially created the CSR with. The certificates must be installed to your keystore in the correct order.

  1. Install the Root Certificate file: Every time you install a certificate to the keystore you must enter the keystore password that you chose when you generated it. Enter the following command to install the Root certificate file:
keytool -import  -trustcacerts -keystore tomcat.jks -storepass changeit -alias root -file root.cer 
  1. Install the Intermediate Certificate file: If your certificate authority provided an intermediate certificate file, you will need to install it here by typing the following command:
keytool -import  -trustcacerts -keystore tomcat.jks -storepass changeit -alias intermediate  -file intermediate.cer

If successful, you will see "Certificate was added to keystore".
  1. Install the Primary Certificate file: Type the following command to install the Primary certificate file (for your domain name):
keytool -import  -trustcacerts -keystore tomcat.jks -storepass changeit -alias tomcat -file servercertificate.cer 

If successful, you will see "Certificate reply was installed in keystore". You now have all the certificates installed to the keystore file. You just need to configure your server to use the keystore file.

Note:- when given api error then use this protocol     
 “protocol="org.apache.coyote.http11.Http11NioProtocol”


Note:- if you have a pfx file then use this command to make.jks


Convert PFX to keystore.jks

Keytool  -importkeystore -srckeystore uatwebsrv1.pfx -srcstoretype pkcs12 -destkeystore uatwebsrv1.jks  -deststoretype  JKS


Configuring your SSL Connector
Tomcat will first need an SSL Connector configured before it can accept secure connections.
1.    Open the Tomcat server.xml file in a text editor (this is usually located in the conf folder of your Tomcat's home directory).
2.    Find the connector that will be secured with the new keystore and uncomment it if necessary (it is usually a connector with port 443 or 8443 like the example below).
3.    Specify the correct keystore filename and password in your connector configuration. When you are done your connector should look something like this:
<Connector port="443" protocol="HTTP/1.1" maxThreads="150" scheme="https" secure="true" SSLEnabled="true" keystoreFile="conf/tomcat.jks" keystorePass="changeit" clientAuth="false" SSLProtocol="TLSv1+TLSv1.1+TLSv1.2" ciphers="TLS_ECDHE_RSA_WITH_AES_256_CBC_SHA384, TLS_RSA_WITH_AES_256_CBC_SHA256, TLS_ECDHE_RSA_WITH_AES_256_CBC_SHA, TLS_RSA_WITH_AES_256_CBC_SHA, TLS_ECDHE_RSA_WITH_3DES_EDE_CBC_SHA, TLS_RSA_WITH_3DES_EDE_CBC_SHA, TLS_ECDHE_RSA_WITH_AES_128_CBC_SHA256, TLS_RSA_WITH_AES_128_CBC_SHA256, TLS_ECDHE_RSA_WITH_AES_128_CBC_SHA, TLS_RSA_WITH_AES_128_CBC_SHA" />
Note: If you are using version 7 of Tomcat you will need to change "keypass" to "keystorePass".
4.    Save your changes to the server.xml file.
5.    Restart Tomcat.


Apache server ssl installation


                             Apache server ssl installation step

1. copy your domain certificate and intermediate certificates to a folder on the server with the private key like /etc/sslcert/ssl.crt

2. Edit your Apache configuration to reference these files. The exact configuration file you will edit will depend on your version of Apache, your OS platform, and/or the method used to install Apache. In Apache 1.3, you will most likely edit the main httpd.conf file. In Apache 2.x, you will most likely edit the ssl.conf file.

4. Now open ssl.conf  file  on this location  /etc/httpd/conf.d
For example:-

Note:-  check below  ssl configuration  in ssl.conf file.


   LoadModule ssl_module modules/mod_ssl.so

    Listen 443

    <VirtualHost _default_:443>

    #   Server Certificate:

  SSLCertificateFile /etc/ssl/certs/mysitename.crt

     #   Server Private Key:

  SSLCertificateKeyFile /etc/ssl/certs/mysitename.key

   #   Server Certificate Chain:

  SSLCertificateChainFile /etc/ssl/certs/ca-bundle.crt


6 .Change the names of the files and paths to match your certificate files:
  1. SSLCertificateFile should be your primary certificate file for your domain name.
  2. SSLCertificateKeyFile should be the key file generated when you created the CSR.
  3. SSLCertificateChainFile should be the intermediate certificate file (if any) that was supplied by your certificate authority

            7. Save the changes and exit the text editor.

8.        8.  Restart Apache services.